Linux tun 设备介绍

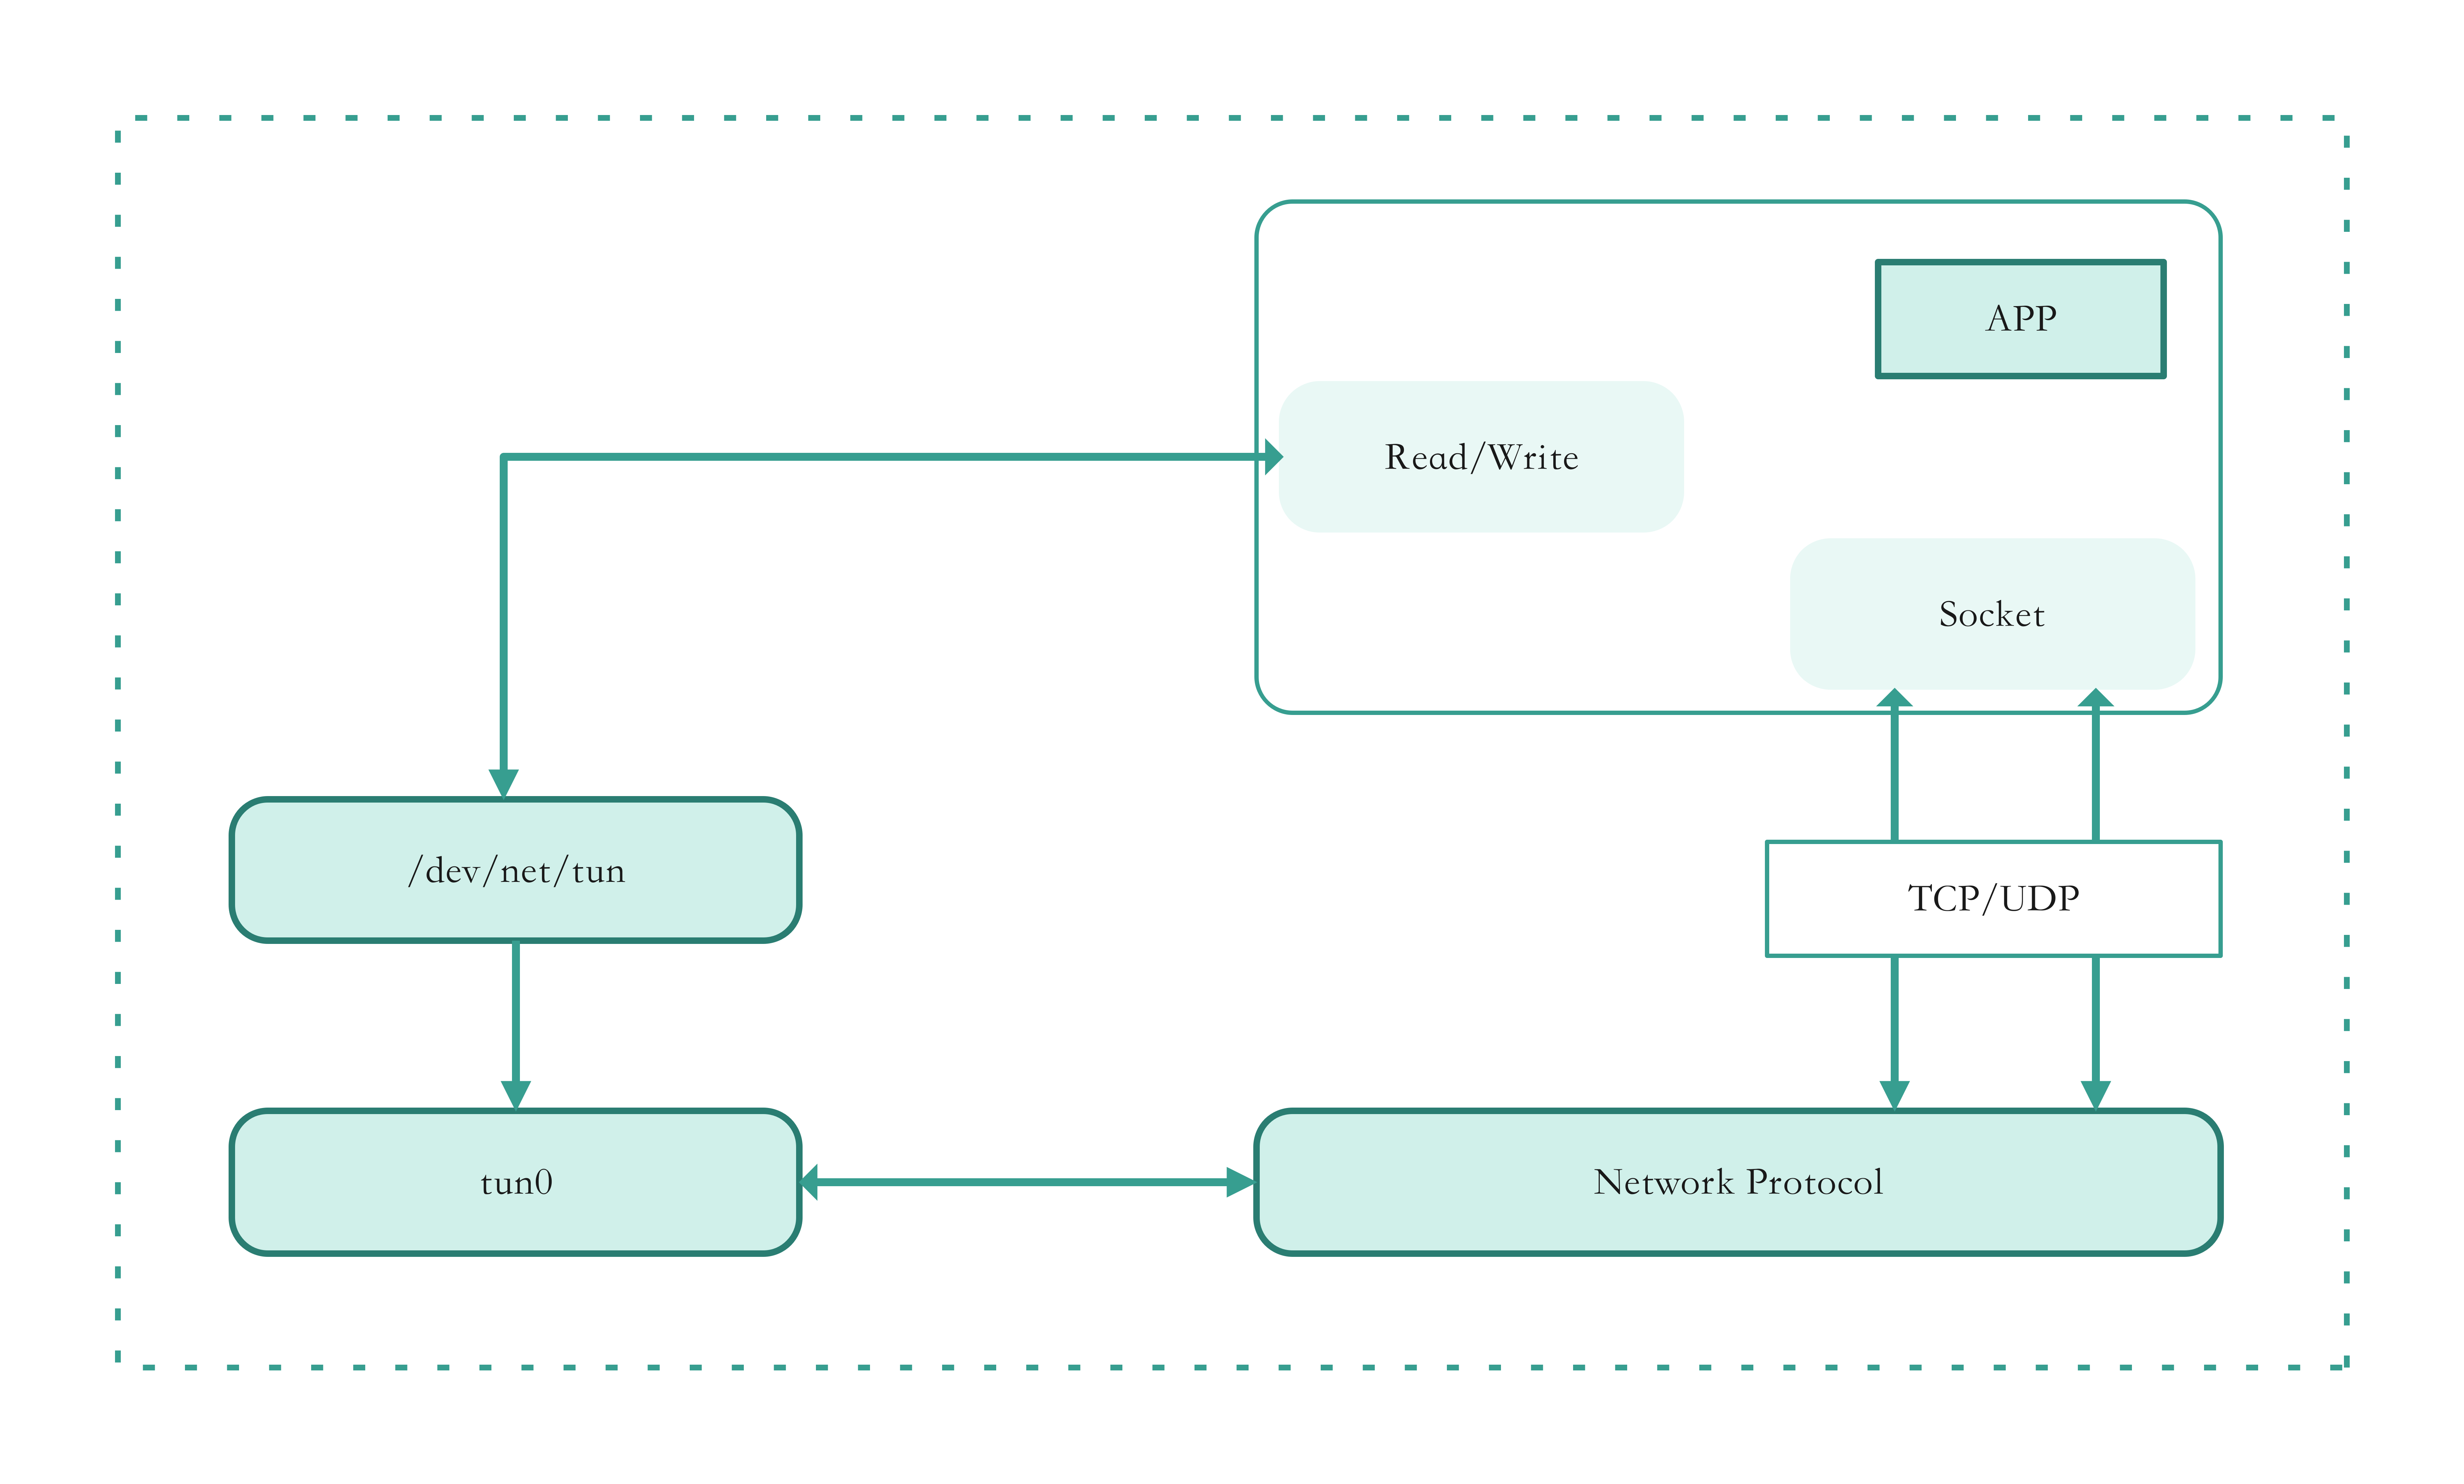
tun 是一种虚拟的3层虚拟网络设备,同时它也是一个字符设备,字符设备意味着可以把它当做一个文件,可以使用文件API操作这个设备,例如 open/read/write,由于它同时也是一个网络设备,所以它也可以像一个网卡一样,从内核网络协议栈中收发报文。所以从它架构上来看,tun 设备的一端连接着应用程序,一端连接着网络协议栈,如下图所示:

从在系统中的表象来看,字符设备的文件类型是c,没有大小,但是有主次版本号:

1
2
$ ls -alh /dev/net/tun
crw-rw-rw- 1 root root 10, 200 Jan 30 17:00 /dev/net/tun

tun 设备的创建是通过打开/dev/net/tun这个文件,然后使用ioctl系统调用对其进行clone。也可以使用 ip 命令来实现tun设备的创建:

ip tuntap add dev tun1 mod tun

新创建的 tun1 设备位于 /sys/class/net/ 目录中:

1
2
$ ll /sys/class/net/tun1
lrwxrwxrwx 1 root root 0 Feb 4 15:44 /sys/class/net/tun1 -> ../../devices/virtual/net/tun1/

删除使用如下命令:

ip tuntap del dev tun1 mod tun

ICMP 示例

如前文所述,tun设备的使用需要打开/dev/net/tun并对其clone之后才能进行使用,所以通用的创建tun设备有如下的步骤:

1
2
3
4
5
6
7
8
9
10
11
12
13
14
15
16
17
18
19
20
21
22
23
24
25
26
27
28
int tun_alloc(char *dev, int flags)
{
assert(dev != NULL);

struct ifreq ifr;
int fd, err;

char *clonedev = "/dev/net/tun";

if ((fd = open(clonedev, O_RDWR)) < 0) {
return fd;
}

memset(&ifr, 0, sizeof(ifr));
ifr.ifr_flags = flags;

if (*dev != '\0') {
strncpy(ifr.ifr_name, dev, IFNAMSIZ);
}
if ((err = ioctl(fd, TUNSETIFF, (void *) &ifr)) < 0) {
close(fd);
return err;
}

strcpy(dev, ifr.ifr_name);

return fd;
}

创建tun设备需要是root的用户,或者该应用程序需要具有CAP_NET_ADMIN权限,/dev/net/tun必须以读写方式打开,它是创建任何tun/tap虚拟接口的起点,因此也被称为克隆设备(clone device)。操作(open())后会返回一个文件描述符,但此时还无法与接口通信。下一步会使用一个特殊的ioctl()系统调用,该函数的入参为上一步得到的文件描述符,以及一个TUNSETIFF常数和一个指向描述虚拟接口的结构体指针。

tun_alloc 函数的两个参数中:

  • dev:指的是创建的tun设备的名称,如果*dev'\0',则内核会尝试使用第一个对应类型的可用的接口,例如从tun0开始,如果tun0存在就为tun1
  • flags:用于指定虚拟设备的类型,通常为IFF_TUN或者IFF_TAP,分别代表tun或者tap设备。除此之外,还有一个IFF_NO_PI标志,可以与IFF_TUNIFF_TAP配合使用。IFF_NO_PI 会告诉内核不需要提供报文信息,即告诉内核仅需要提供"纯"IP报文,不需要其他字节。否则(不设置IFF_NO_PI),会在报文开始处添加4个额外的字节(2字节的标识和2字节的协议);

如果要完整的处理到达tun设备的ICMP请求,需要手动回响应:

1
2
3
4
5
6
7
8
9
10
11
12
13
14
15
16
17
18
19
20
21
22
23
24
25
26
27
28
29
30
31
32
33
34
35
36
37
38
39
40
41
42
43
44
45
46
47
48
49
50
51
52
53
54
55
56
57
58
int main()
{
int tun_fd, nread;
char buffer[4096];
char tun_name[IFNAMSIZ];

tun_name[0] = '\0';

tun_fd = tun_alloc(tun_name, IFF_TUN | IFF_NO_PI);

if (tun_fd < 0) {
perror("Allocating interface");
exit(1);
}

printf("Open tun/tap device: %s for reading...\n", tun_name);

while (1) {
unsigned char ip[4];
// 收包
nread = read(tun_fd, buffer, sizeof(buffer));
if (nread < 0) {
perror("Reading from interface");
close(tun_fd);
exit(1);
}

// IP 报文第9个字节表示协议类型,其中:
// 1: ICMP
// 6: TCP
// 17: UDP
if (buffer[9] != 1) {
continue;
}

printf("Read %d bytes from tun/tap device, icmp type: %d\n", nread, buffer[20]);

// IP报文中,从12个字节开始的连续4个字节保存源IP地址,第16个字节开始的连续4字节保存目的IP
// 这里调换 ICMP 请求中的源IP和目的IP。用于响应
// 更多关于IP报文格式的请看:https://www.tutorialspoint.com/ipv4/ipv4_packet_structure.htm
memcpy(ip, &buffer[12], 4);
memcpy(&buffer[12], &buffer[16], 4);
memcpy(&buffer[16], ip, 4);

// IP 头的长度是20个字节,对于ICMP报文,第20个字节表示TCMP报文类型:
// 0: 表示 Echo Reply
// 8: 表示 Echo Request
buffer[20] = 0;
*((unsigned short *)&buffer[22]) += 8;

printf("source ip addr: %d %d %d %d \n", ip[0], ip[1], ip[2], ip[3]);

// 发包
nread = write(tun_fd, buffer, nread);
printf("Write %d bytes to tun device\n", nread);
}
return 0;
}

完整的示例程序如下所示:

点击展开

1
2
3
4
5
6
7
8
9
10
11
12
13
14
15
16
17
18
19
20
21
22
23
24
25
26
27
28
29
30
31
32
33
34
35
36
37
38
39
40
41
42
43
44
45
46
47
48
49
50
51
52
53
54
55
56
57
58
59
60
61
62
63
64
65
66
67
68
69
70
71
72
73
74
75
76
77
78
79
80
81
82
83
84
85
86
87
88
89
90
91
92
93
94
95
96
97
98
99
#include <stdio.h>
#include <stdlib.h>
#include <assert.h>
#include <net/if.h>
#include <sys/ioctl.h>
#include <sys/stat.h>
#include <fcntl.h>
#include <string.h>
#include <sys/types.h>
#include <linux/if_tun.h>
#include <unistd.h>

int tun_alloc(char *dev, int flags)
{
assert(dev != NULL);

struct ifreq ifr;
int fd, err;

char *clonedev = "/dev/net/tun";

if ((fd = open(clonedev, O_RDWR)) < 0) {
return fd;
}

memset(&ifr, 0, sizeof(ifr));
ifr.ifr_flags = flags;

if (*dev != '\0') {
strncpy(ifr.ifr_name, dev, IFNAMSIZ);
}
if ((err = ioctl(fd, TUNSETIFF, (void *) &ifr)) < 0) {
close(fd);
return err;
}

strcpy(dev, ifr.ifr_name);

return fd;
}

int main()
{
int tun_fd, nread;
char buffer[4096];
char tun_name[IFNAMSIZ];

tun_name[0] = '\0';

tun_fd = tun_alloc(tun_name, IFF_TUN | IFF_NO_PI);

if (tun_fd < 0) {
perror("Allocating interface");
exit(1);
}

printf("Open tun/tap device: %s for reading...\n", tun_name);

while (1) {
unsigned char ip[4];
// 收包
nread = read(tun_fd, buffer, sizeof(buffer));
if (nread < 0) {
perror("Reading from interface");
close(tun_fd);
exit(1);
}

// IP 报文第9个字节表示协议类型,其中:
// 1: ICMP
// 6: TCP
// 17: UDP
if (buffer[9] != 1) {
continue;
}

printf("Read %d bytes from tun/tap device, icmp type: %d\n", nread, buffer[20]);
printf("source ip addr: %d %d %d %d \n", buffer[12], buffer[13], buffer[14], buffer[15]);
printf("destination ip addr: %d %d %d %d \n", buffer[16], buffer[17], buffer[18], buffer[19]);

// IP报文中,从12个字节开始的连续4个字节保存源IP地址,第16个字节开始的连续4字节保存目的IP
// 这里调换 ICMP 请求中的源IP和目的IP。用于响应
// 更多关于IP报文格式的请看:https://www.tutorialspoint.com/ipv4/ipv4_packet_structure.htm
memcpy(ip, &buffer[12], 4);
memcpy(&buffer[12], &buffer[16], 4);
memcpy(&buffer[16], ip, 4);

// IP 头的长度是20个字节,对于ICMP报文,第20个字节表示TCMP报文类型:
// 0: 表示 Echo Reply
// 8: 表示 Echo Request
buffer[20] = 0;
*((unsigned short *)&buffer[22]) += 8;

// 发包
nread = write(tun_fd, buffer, nread);
printf("Write %d bytes to tun device\n", nread);
}
return 0;
}

将完整的源代码保存成文件tun.c,使用如下的命令进行编译:

gcc -o taptun tun.c

打开终端运行编译生成的可执行程序taptun可执行程序。然后打开另外一个终端,查询创建的tun0设备:

1
2
3
4
5
6
7
$ ifconfig tun0
tun0: flags=4240<POINTOPOINT,NOARP,MULTICAST> mtu 1500
unspec 00-00-00-00-00-00-00-00-00-00-00-00-00-00-00-00 txqueuelen 500 (UNSPEC)
RX packets 0 bytes 0 (0.0 B)
RX errors 0 dropped 0 overruns 0 frame 0
TX packets 0 bytes 0 (0.0 B)
TX errors 0 dropped 0 overruns 0 carrier 0 collisions 0

这个时候的tun0还未设置IP地址,可以使用如下的命令进行设置并启用:

ip a a 10.1.1.2/24 dev tun0
ip l s tun0 up

再次查看该设备,可以看到IP地址已经设置,并且处于启用状态:

1
2
3
4
5
6
7
8
9
$ ifconfig tun0
tun0: flags=4305<UP,POINTOPOINT,RUNNING,NOARP,MULTICAST> mtu 1500
inet 10.1.1.2 netmask 255.255.255.0 destination 10.1.1.2
inet6 fe80::2ee1:4ade:16e4:8355 prefixlen 64 scopeid 0x20<link>
unspec 00-00-00-00-00-00-00-00-00-00-00-00-00-00-00-00 txqueuelen 500 (UNSPEC)
RX packets 1 bytes 48 (48.0 B)
RX errors 0 dropped 0 overruns 0 frame 0
TX packets 1 bytes 48 (48.0 B)
TX errors 0 dropped 0 overruns 0 carrier 0 collisions 0

创建设置并且设置IP以后,可以看到操作系统会自动添加一条路由,表示发往 10.1.1.0/24 这个网段的所有报文都会经 tun0 设备发出:

1
2
3
4
$ route -n
Kernel IP routing table
Destination Gateway Genmask Flags Metric Ref Use Iface
10.1.1.0 0.0.0.0 255.255.255.0 U 0 0 0 tun0

所以只要ping这个网段内的任一IP都会到达tun0设备,并且被我们的taptun应用程序收到并处理,例如:

1
2
3
4
5
6
7
8
9
10
11
12
13
14
$ ping -c 1 10.1.1.10
PING 10.1.1.10 (10.1.1.10) 56(84) bytes of data.
64 bytes from 10.1.1.10: icmp_seq=1 ttl=64 time=0.080 ms

--- 10.1.1.10 ping statistics ---
1 packets transmitted, 1 received, 0% packet loss, time 0ms
rtt min/avg/max/mdev = 0.080/0.080/0.080/0.000 ms
$ ping -c 1 10.1.1.111
PING 10.1.1.111 (10.1.1.111) 56(84) bytes of data.
64 bytes from 10.1.1.111: icmp_seq=1 ttl=64 time=0.189 ms

--- 10.1.1.111 ping statistics ---
1 packets transmitted, 1 received, 0% packet loss, time 0ms
rtt min/avg/max/mdev = 0.189/0.189/0.189/0.000 ms

应用程序将会有如下的输出:

1
2
3
4
5
6
7
8
9
10
$ ./taptun
Open tun/tap device: tun0 for reading...
Read 84 bytes from tun/tap device, icmp type: 8
source ip addr: 10 1 1 2
destination ip addr: 10 1 1 10
Write 84 bytes to tun device
Read 84 bytes from tun/tap device, icmp type: 8
source ip addr: 10 1 1 2
destination ip addr: 10 1 1 111
Write 84 bytes to tun device

参考链接

  1. IP packets
  2. IPv4 - Packet Structure
  3. ICMP Explained and Packet Format
  4. https://juejin.cn/post/7057833934947614750
  5. https://blog.51cto.com/u_11299290/5107265
  6. https://ctimbai.github.io/2019/03/01/tech/net/vnet/基于taptun写一个ICMP程序/
  7. https://www.zhengwenfeng.com/pages/143447/#应用程序通过tun设备获取ping数据包
  8. https://lxd.me/a-simple-vpn-tunnel-with-tun-device-demo-and-some-basic-concepts
  9. https://www.rectcircle.cn/posts/linux-net-virual-05-tunnel/#tun-tap-虚拟设备
  10. https://www.zhaohuabing.com/post/2020-02-24-linux-taptun/
  11. https://www.luozhiyun.com/archives/684
  12. https://blog.avdancedu.com/52f625ca/
  13. https://www.xzcoder.com/posts/network/05-simple-vpn.html#程序测试