【Rust】Crate 和 Module
Crates
Rust 程序是由 crate 组成的,每个 crate 都是一个完整的的单元:单个库或可执行文件的所有源代码,以及任何相关的测试、示例、工具、配置和其他东西。可以使用 cargo build --verbose 查看项目中使用了哪些 crates。
通常项目的依赖都是配置在 Cargo.toml 文件中,例如:
1 | [dependencies] |
可以通过 cargo build,cargo install 或者 cargo add 下载依赖代码。一旦有了源代码,Cargo 就会编译所有的 crate。它为项目依赖图中的每个 crate 运行一次 rustc(Rust 编译器)。编译库时,Cargo 使用 --crate-type lib 选项。这告诉 rustc 不要寻找 main() 函数,而是生成一个 .rlib 文件,其中包含可用于创建二进制文件和其他 .rlib 文件的编译代码。例如:
1 | rustc --crate-name num --edition=2018 /Users/fudenglong/.cargo/registry/src/mirrors.ustc.edu.cn-61ef6e0cd06fb9b8/num-0.4.0/src/lib.rs --error-format=json --json=diagnostic-rendered-ansi,artifacts,future-incompat --crate-type lib --emit=dep-info,metadata,link -C embed-bitcode=no -C split-debuginfo=unpacked -C debuginfo=2 --cfg 'feature="default"' --cfg 'feature="num-bigint"' --cfg 'feature="std"' -C metadata=b84820de50dc7f78 -C extra-filename=-b84820de50dc7f78 --out-dir /Users/fudenglong/WORKDIR/rust/mandelbrot/target/debug/deps -L dependency=/Users/fudenglong/WORKDIR/rust/mandelbrot/target/debug/deps --extern num_bigint=/Users/fudenglong/WORKDIR/rust/mandelbrot/target/debug/deps/libnum_bigint-bd772250e89d4bb9.rmeta --extern num_complex=/Users/fudenglong/WORKDIR/rust/mandelbrot/target/debug/deps/libnum_complex-d3fd80f953e1ac52.rmeta --extern num_integer=/Users/fudenglong/WORKDIR/rust/mandelbrot/target/debug/deps/libnum_integer-7ff0466209086397.rmeta --extern num_iter=/Users/fudenglong/WORKDIR/rust/mandelbrot/target/debug/deps/libnum_iter-2b149e71dbad2afc.rmeta --extern num_rational=/Users/fudenglong/WORKDIR/rust/mandelbrot/target/debug/deps/libnum_rational-1686ad6eb82c18d4.rmeta --extern num_traits=/Users/fudenglong/WORKDIR/rust/mandelbrot/target/debug/deps/libnum_traits-deaceb32c41a04f1.rmeta --cap-lints allow |
对于每个 rustc 命令,Cargo 都会传递 --extern 选项,给出 crate 将使用的每个库的文件名。这样,当 rustc 看到像 use num::bigint::BigInt; 这样的代码行时,它可以确定 num 是另一个 crate 的名称,并且通过 Cargo,可以在磁盘上找到已编译的 crate。Rust 编译器需要访问这些 .rlib 文件,因为它们包含库的编译代码, Rust 会将该代码静态链接到最终的可执行文件中。 .rlib 还包含类型信息,因此 Rust 可以检查我们在代码中使用的库功能是否确实存在,以及我们是否正确使用它们,它还包含 crate 的公共内联函数、泛型和宏的副本等。
如果编译程序时,Cargo 使用 --crate-type bin,结果将会生成目标平台的二进制可执行文件。
Edition
Rust 具有极强的兼容性保证,在 Rust 1.0 上编译的任何代码都必须在 Rust 1.50 上编译。但有时社区会遇到令人信服的扩展语言的提议,这会导致旧代码不再编译。例如,经过多次讨论,Rust 确定了一种支持异步编程的语法,将标识符 async 和 await 重新用作关键字。但是这种语言更改会破坏任何使用 async 或 await 作为变量名称的现有代码。
为了在不破坏现有代码的情况下发展,Rust 使用 Edition。Rust 2015 版与 Rust 1.0 兼容。2018 将 async 和 await 更改为关键字,简化了模块系统,并引入了与 2015 不兼容的各种其他语言更改。打开 Cargo.toml 我们会看到如下的 Edition 声明,默认是 2021:
1 | [package] |
Rust 的编译器承诺始终接受该语言的所有现存版本,并且程序可以自由地混合使用不同版本编写的 crate,例如,2015 的 crate 依赖于 2018 的 crate 甚至可以,换句话说,一个 crate 的版本只影响其源代码的解释方式,代码编译完成之后,就没有所谓的 Edition 区分了,在学要使用语言的新功能时,我们只需要修改 Edition即可。
版本不会每年都发布,只有在 Rust 项目决定需要时才会发布,例如,没有 2020 版,将版本设置为 2020 会导致错误。Rust 版本指南 涵盖了每个版本中引入的更改,并提供了版本系统的良好背景,对于新代码,建议总是使用最新的版本,cargo new 默认在最新版本上创建新项目。如果有一个用旧版 Rust 编写的 crate,cargo fix 命令会帮助你自动将代码升级到新版本。
Profile
配置文件提供了一种更改编译器设置的方法,影响优化和调试符号等内容。Cargo 有 4 个内置配置文件:dev、release、test 和 bench。如果未在命令行上指定配置文件,则会根据正在运行的命令自动选择配置文件。除了内置配置文件外,还可以指定自定义的用户定义配置文件。
可以使用 [profile] 在 Cargo.toml 中更改配置文件设置,在每个命名配置文件中,可以使用如下键/值对更改各个设置:
1 | [profile.dev] |
cargo build 会使用 [profile.dev] 的配置,cargo build --release 会使用 [profile.release] 的配置,cargo test 使用 [profile.test] 中的配置。
更多详细的内容请看 Cargo Profiles。
Module
crate 就是第三方模块,用于项目之间的代码共享,而 Module 是项目内的代码组织。它们充当 Rust 的命名空间、构成 Rust 程序或库的函数、类型、常量等的容器。一个模块如下所示:
1 | mod spores { |
本例中,模块是 Spore 结构和两个函数的集合。pub 关键字使得标记的项公开,因此可以从模块外部访问它。
一个函数被标记为 pub(crate),这意味着它在这个 crate 内的任何地方都可用,但不作为外部接口的一部分公开。它不能被其他 crate 使用,也不会出现在这个 crate 的文档中。被标记为 pub 的项目通常称为导出该项目,任何未标记为 pub 的内容都是私有的,只能在定义它的同一模块或任何子模块中使用:
1 | let s = spores::produce_spore(&mut factory); // ok |
模块嵌套
模块可以嵌套,一个模块可能仅仅是子模块的集合:
1 | mod plant_structures { |
如果希望嵌套模块中的项目对其他 crate 可见,必须将到达这个项的所有模块都标记为 pub。也可以指定 pub(super),使项目仅对父模块可见,以及 pub(in <path>),使其在特定父模块及其后代中可见。这对于深度嵌套的模块特别有用:
1 | mod plant_structures { |
通过这种方式,我们可以编写一个完整的程序,包含大量代码和整个模块层次结构,以我们想要的任何方式组织起来,而所有这些都在一个源文件中。
模块和文件系统
如果将模块以单个文件形式组织,这种方式工作很痛苦,大型项目中往往需要拆分,将不同的功能的代码以不同的文件区分,使得代码在逻辑上,物理组织上都能很清晰。
单文件模块
之前我们是在 spores 模块中使用括号将模块的内容包裹起来的,现在可以在单个源码文件中开发模块。我们在 main.rs 中声明如下模块:
1 | mod spores; |
然后在 spores.rs 开发该模块的代码:
1 | /// A cell made by an adult fern... |
公开和私有的原则和之前讲的是相同的,Rust 从不单独编译模块,即使它们在单独的文件中:当你构建一个 crate 时,会重新编译它的所有模块。当 Rust 看到一个模块时,例如上面的 mod spores; 时,它会检查 spores.rs 和 spores/mod.rs 是否存在,如果都存在或者都不存在,就会报错。
模块目录(一)
但是当我们的模块中包含子模块时,就不能像 spores.rs 那样单独处理了,就像之前的 plant_structures 模块。如果,我们有下面这样的结构:
1 | fern_sim/ |
在 main.rs,我们声明 plant_structures 模块,这会让 Rust 加载 plant_structures/mod.rs:
1 | pub mod plant_structures; |
然后,我们再声明子模块:
1 | pub mod roots; |
这三个模块的内容存储在名为 leaves.rs、roots.rs 和 stems.rs 的单独文件中,和 plant_structures/mod.rs 同级。
模块目录(二)
我们也可以使用文件和目录一起组成模块,如果之前的 stems 需要包含 xylem 和 phloem,我们选择保留 plant_structures/stems.rs,然后再添加一个 stems 目录:
1 | fern_sim/ |
然后,我们可以在 stems.rs 中声明两个新模块:
1 | pub mod xylem; |
所以这里有三种模块组织方式:
- 模块在他们自己的文件中;
- 模块在他们自己的目录中,带有
mod.rs; - 模块在他们自己的文件中,带有包含子模块的补充目录;
导入
:: 操作符被用于访问其他模块的功能。我们可以直接使用其他模块中的功能而不实现导入,例如:
1 | std::mem::swap(&mut s1, &mut s2); |
std 指向标准库的顶层模块,mem 是其中的一个子模块,std::mem::swap 只是其中的一个导出函数。上面的这种使用访问方式有点冗长,另一种方式是将要使用的功能导入当前的模块,使用 use 将 std::mem 引入到当前模块,并且定义新的别 mem:
1 | use std::mem; |
我们可以写 use std::mem::swap; 导入 swap 函数本身而不是 mem 模块。但最好的方式是:导入类型、trait和模块(如 std::mem),然后使用相对路径访问其中的函数、常量和其他成员。例如:
1 | use std::collections::{HashMap, HashSet}; // 同时导入 |
我们也可以使用 as 对导入的名称进行重命名:
1 | use std::io::Result as IOResult; |
子模块不会自动导入父模块的内容,假设我们的 proteins/mod.rs 中内容是这样子的:
1 | pub enum AminoAcid { ... } |
那么模块 proteins/synthesis.rs 中如果不导入 AminoAcid 是不能直接使用的:
1 | pub fn synthesize(seq: &[AminoAcid]) // error: can't find type `AminoAcid` |
而是,每个模块都是以一个空的状态开始的,必须手动导入它使用的任何内容(也不完全是空的,有预导入):
1 | use super::AminoAcid; // explicitly import from parent |
默认情况下,是从当前模块开始导入:
1 | pub mod synthesis; |
self 是当模块的昵称,因此在 proteins/mod.rs 中可以这样写:
1 |
|
也可以简化为:
1 | use AminoAcid::*; |
除了从顶层模块导入,从 self 当前模块导入或者从当前的子模块导入之外,还可以通过 super 或者 crate 关键字进行导入,其中 super 表示父模块,而 crate 表示当前模块的 crate。
使用相对于 crate 根目录的导入而不是相对于当前路径的导入,有助于在项目中移动代码。因为如果当前模块的路径发生更改,所有导入都不会中断。例如:
1 | use crate::proteins::AminoAcid; // 显示从 crate 的根导入 |
之前看了从父模块导入子模块,但是如果从子模块导入父模块的内容,可以使用 super::。
如果你有一个模块和外部 crate 同名,在导入的时候就要注意了,否则会引起错误。例如,如果引用了 image,自己也有个 image 模块:
1 | mod image { |
解决这个问题的方法是使用绝对导入,导入以 :: 开始,例如,如果要导入第三方 image,可以这样写:
1 | use ::image::Pixels; // the `image` crate's `Pixels` |
引入内部的 image module 可以这样写:
1 | use self::image::Sampler; // the `image` module's `Sampler` |
预导入
之前说每个模块都以空的状态开始,但其实也不完全是空的,因为 Rust 有很多常用的类型,为了简化编程,Rust 会帮我们导入,不用我们显示导入。例如:Vec 和 Result。
自动导入的内容可以看这里,std::prelude。
别名导出
use 只是将我们使用的内容从其他模块或者 crate导入并且在本模块起了个没别名,但是它也可以将导入的内容重新导出。例如:
1 | pub use self::leaves::Leaf; |
这意味着 Leaf 和 Root 是 plant_structures 模块中的公共内容,它们也仍然是 self::leaves::Leaf 和 self::roots::Root 的别名。
结构体导出
module 可以包含用户定义的结构体类型,使用 struct 关键字引入,它和它的字段也可以由 pub 声明是否导出。一个简单的结构如下所示:
1 | pub struct Fern { |
结构体的所有字段,甚至私有字段,都可以在声明结构体的模块及其子模块中访问,在模块之外,只能访问导出字段。
静态变量和常量
const 关键字引入了一个常量。 语法和 let 一样,只是它可能被标记为 pub,并且类型是必需的。此外,大写名称对于常量来说是常规的:
1 | pub const ROOM_TEMPERATURE: f64 = 20.0; // degrees Celsius |
static 关键字引入了一个静态项,和 const:
1 | pub static ROOM_TEMPERATURE: f64 = 68.0; // degrees Fahrenheit |
常量有点像 C 中的 #define,值会被编译到使用的地方。静态变量是在程序开始运行之前设置并持续到退出的变量。在代码中使用常量作为 magic number 和字符串,对大量数据或任何需要借用常量值的引用的时候使用静态。
没有 mut 类型常量,静态变量可以标记为 mut,Rust 无法强制执行其关于对 mut 静态变量的独占访问的规则。因此,它们本质上是非线程安全的,安全代码根本不能使用它们,Rust 不鼓励全局可变状态:
1 | static mut PACKETS_SERVED: usize = 0; |
开发 library 项目
如果想要将项目编译成一个 lib 而不是一个可执行文件,我们只需要三步:
-
将
src/main.rs重命名成src/lib.js; -
添加
pub关键字给src/lib.js中的导出内容; -
移除
src/main.rs中的main函数;
我们不需要更改 Cargo.toml 中的任何内容 默认情况下,cargo build 查看源目录中的文件并确定要构建的内容。当它看到文件 src/lib.rs 时,就知道需要去构建一个 lib。src/lib.rs 中的代码构成了库的根模块,使用我们的其他 crate 只能访问此根模块的公共项目。
src/bin 目录
我们可以让一个项目是 lib,也可以让它同时编译成一个可执行程序,只是需要将 main 函数移到目录 sr/bin 中,而且可以有多个 main 函数,例如我的项目结构如下:
1 | ~/WORKDIR/rust/mandelbrot 20:15:24 |
各个文件的内容如下:
1 | use num::bigint::BigInt; |
1 | use mandelbrot::approx_sqrt; |
1 | use mandelbrot::approx_sqrt; |
1 | [package] |
我们可以指定运行不同的 main 函数:
~/WORKDIR/rust/mandelbrot 20:25:13
$ cargo run --bin mandelbrot
    Finished dev [unoptimized + debuginfo] target(s) in 0.00s
    Running `target/debug/mandelbrot`
4057691201/1283082416

~/WORKDIR/rust/mandelbrot 20:25:15
$ cargo run --bin mandelbrot_v2
  Compiling mandelbrot v0.1.0 (/Users/fudenglong/WORKDIR/rust/mandelbrot)
    Finished dev [unoptimized + debuginfo] target(s) in 0.15s
    Running `target/debug/mandelbrot_v2`
4057691201/1283082416
属性
Rust 程序中的任何项目都可以用属性进行修饰。属性是 Rust 用于向编译器编写杂项指令和建议的语法。例如,假设您收到以下警告:
libgit2.rs: warning: type `git_revspec` should have a camel case name
such as `GitRevspec`, #[warn(non_camel_case_types)] on by default
但是你选择这个名字是有原因的,你希望屏蔽这个告警,可以通过在类型上添加 #[allow] 完成:
1 |
|
条件编译是使用属性编写的另一个功能,即 #[cfg]:
1 | // 只有在编译安卓平台的项目时包含这个模块 |
#[cfg] 常用的属性可以看 条件编译。
给函数添加 #[inline] 属性可以建议编译器根据情况决定是否内联函数。
1 |
|
当一个 crate 中定义的函数或方法在另一个 crate 中被调用时,Rust 不会内联它,除非它是泛型的或显式标记为 #[inline]。Rust 还支持更直接的 #[inline(always)],要求在每个调用点内联扩展函数,并支持 #[inline(never)],要求永远不要内联函数。
一些属性,如 #[cfg] 和#[allow],可以附加到整个模块并应用于其中的所有内容。其他的,如 #[test] 和#[inline],必须附加到单个项目,每个属性都是可以指定参数进行定制,这里看完整的属性列表。
要将属性附加到整个 crate,请将其添加到 main.rs 或 lib.rs 文件的顶部,在任何内容之前,然后写 #! 而不是#,像这样:
1 |
|
#! 通常只用于文件的开头,用于将属性附加到整个模块或 crate。某些属性总是使用 #! 语法,因为它们只能应用于整个 crate。 例如,#![feature] 属性用于打开 Rust 语言和库的不稳定特性,这些特性是实验性的,因此可能存在错误,或者将来可能会被更改或删除。
例如,Rust 为跟踪宏的扩展提供了实验性支持,比如 assert!,但是由于这种支持是实验性的,你只能通过
- (1) 安装
nightly版本的Rust; - (2) 来使用
#![feature(trace_macros)]明确使用trace_macros;
1 |
|
单元测试
Rust 内置了一个单元测试框架,任何由 #[test] 标记的普通函数是测试函数:
1 |
|
cargo test 用于运行项目中的所有测试函数:
$ cargo test
Compiling math_test v0.1.0 (file:///.../math_test)
Running target/release/math_test-e31ed91ae51ebf22
running 1 test
test math_works ... ok
test result: ok. 1 passed; 0 failed; 0 ignored; 0 measured; 0 filtered out
可以通过 cargo test TESTNAME 指定要运行的测试函数需要包含的关键字,以运行某些测试。
通常使用 asset! 和 asset_eq! 在测试中对结果进行断言,如果断言失败,程序就会 panic。asset! 和 asset_eq! 没有包含在 release 版本中,如果仅仅是构建 debug 版本,可以使用 debug_assert! 和 debug_assert_eq!。
为了测试错误情况,可以添加 #[should_panic] 给测试函数,这个例子中我们也使用了 #allow 允许我们无条件 panic:
1 | /// This test passes only if division by zero causes a panic, |
还可以从测试中返回 Result<(), E>:
1 | /// if 1024 是有效的数字,这个测试会通过 |
标有#[test] 的函数是会条件编译的。普通的 cargo build 或 cargo build --release 会跳过测试代码。但运行 cargo test 时,Cargo 会构建程序两次:一次以普通方式,一次来运行测试。这意味着单元测试可以与他们测试的代码一起使用,如果需要,可以访问内部实现细节,而且没有运行时成本。但是,它可能会导致一些警告。 例如:
1 | fn roughly_equal(a: f64, b: f64) -> bool { |
在省略了测试代码的构建中,roughly_equal 似乎没有被使用,Rust 会报错:
$ cargo build
Compiling math_test v0.1.0 (file:///.../math_test)
warning: function is never used: `roughly_equal`
--> src/crates_unused_testing_function.rs:7:1
|
7 | / fn roughly_equal(a: f64, b: f64) -> bool {
8 | | (a - b).abs() < 1e-6
9 | | }
| |_^
|
= note: #[warn(dead_code)] on by default
按照约定,当测试代码需要一些代码支持时,需要放进 tests 模块,并且使用 #[cfg(test)] 标记整个模块:
1 | // include this module only when testing |
集成测试
我们可以在 src 目录同级创建一个 tests 目录,用于放我们的集成测试代码,集成测试将我们的库代码当做外部 crate 链接然后进行测试,因此集成测试也只能测试公共 API:
1 | use fern_sim::Terrarium; |
cargo test 命令会同时运行集成测试和单元测试,如果只想运行 tests/unfurl.rs 中的集成测试代码,可以使用 cargo test --test unfurl。
文档
cargo doc 命令可以生成 crate 的文档,文档中会包含库中 pub 内容的文档,文档就是添加到它们上面的注释。例如:
1 | /// Simulate the production of a spore by meiosis. |
当 Rust 看到三个斜线开头的注释时,就相当于使用 #[doc],上面的例子等价于:
1 |
|
除了 /// 样式的注释之外,还有 //!,被当做 #![doc],经常用于模块或者 crate,例如 src/lib.rs 可能像下面这样:
1 | //! Simulate the growth of ferns, from the level of |
注释的内容会被当做 Markdown 格式,还可以包含 Html 标记。注释有个特色功能就是可以用 Rust 的模块组织路径去引用 Rust 定义的函数,结构体等。例如:
1 | /// Create and return a [`VascularPath`] which represents the path of |
还可以添加搜索别名,以便使用内置搜索功能更轻松地查找内容。在这个 crate 的文档中搜索 path 或 route 都能找到 VascularPath:
1 |
|
还可以使用 backticks 在运行文本的中间设置一些代码,在输出中,这些片段将被格式化为固定宽度的字体。可以通过缩进4个空格来添加更大的代码示例:
1 | /// A block of code in a doc comment: |
也可以使用 Markdown 格式的代码风格,有同样效果:
1 | /// Another snippet, the same code, but written differently: |
还有很多注释类型,可以参考这里 注释。
文档测试
当运行测试的时候,Rust 会检查所有出现在文档中的代码块,编译成一个独立的 crate,然后和我们的库链接并执行。下面是一个用 cargo new --lib ranges 创建的例子,把下面的代码的放入 ranges/src/lib.rs 中:
1 | use std::ops::Range; |
使用 cargo doc --no-deps --open 应该能看到下面的文档:
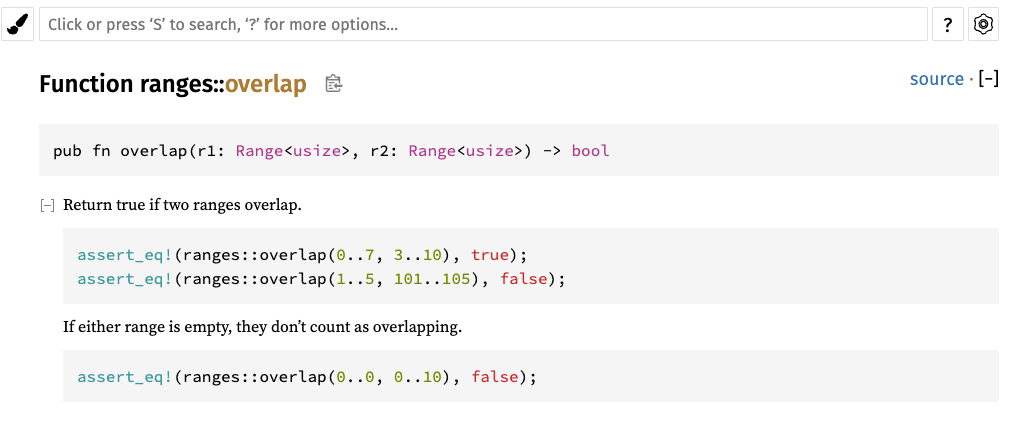
如果运行 cargo test 会看到如下的信息:
~/WORKDIR/rust/ranges ⌚ 9:57:08
$  cargo test
    Finished test [unoptimized + debuginfo] target(s) in 0.00s
    Running unittests src/lib.rs (target/debug/deps/ranges-13060b2daf473d43)

running 0 tests

test result: ok. 0 passed; 0 failed; 0 ignored; 0 measured; 0 filtered out; finished in 0.00s

  Doc-tests ranges

running 2 tests
test src/lib.rs - overlap (line 5) ... ok
test src/lib.rs - overlap (line 10) ... ok

test result: ok. 2 passed; 0 failed; 0 ignored; 0 measured; 0 filtered out; finished in 0.63s
如果你将 cargo test --verbose,你会看到它使用 rustdoc --test 来运行这两个文档中的测试。rustdoc 将每个代码示例存储在一个单独的文件中,添加几行样例代码,以生成两个程序。 例如:
1 | use ranges; |
doc test 背后的想法不是把所有的测试都放在文档中,而是确保文档中的代码能正常编译运行。一个代码示例将包含一些诸如导入类的东西,但是如果想在代码中隐藏,可以以 # 开头:
1 | /// Let the sun shine in and run the simulation for a given |
生成的文档如下图所示,省略了 # 开头的导入:

有时在文档中展示一个完整的示例程序会很有帮助,包括一个 main 函数。 rustdoc 将包含确切字符串 fn main 的任何代码块视为一个完整的程序,并且不会向其中添加任何内容。
如果我们想要实际编译代码块,但又不行让 rust 运行它,可以添加 no_run 标记:
1 | /// Upload all local terrariums to the online gallery. |
但是如果也不想编译,那么使用 ignore,而不是 no_run。如果代码块根本不是 Rust 代码,请使用语言的名称,如 c 或 sh,或 text(表示纯文本),它将任何它无法识别的注释视为表明代码块不是 Rust,这会禁用代码高亮和文档测试。
依赖声明
关于依赖声明,详细请看 cargo 依赖声明。
-
image = "0.6.1":指定版本号,从crates.io下载依赖: -
image = { git = "https://github.com/Piston/image.git", rev = "528f19c" }:指定版本号和原本下载路径; -
image = { path = "vendor/image" }指定包含依赖源代码的相对目录;
依赖版本号
当我们在 Cargo.toml 文件中写入类似 image = "0.13.0" 的内容时,Cargo 对此的解释相当松散,它使用被认为与 0.13.0 版本兼容的最新版本的 image。兼容性规格改编自 语义化版本 2.0.0。
-
以
0.0开头的版本号非常原始,以至于Cargo从不认为它与任何其他版本兼容; -
以
0.x开头的版本号(其中x非零)被认为与0.x系列中的其他点版本兼容。 我们指定了image版本0.6.1,但如果可用,Cargo将使用0.6.3; -
一旦项目达到
1.0,由于新的主版本会破坏兼容性。因此,如果要求版本2.0.1,Cargo可能会使用2.17.99,而不是3.0;
默认情况下,版本号是灵活的,否则使用哪个版本的问题很快就会变得过分约束。假设一个库 libA 使用 num = "0.1.31" 而另一个库 libB 使用 num = "0.1.29"。如果版本号需要完全匹配,则没有项目能够同时使用这两个库,允许 Cargo 使用任何兼容版本是一个更实用的默认设置。
尽管如此,不同的项目在依赖关系和版本控制方面有不同的需求。可以使用运算符指定确切的版本或版本范围:
Cargo.toml |
解释 |
|---|---|
image = "=0.10.0" |
完全匹配 0.10.0 版本 |
image = ">=1.0.5" |
使用 1.0.5 或者更高的版本,甚至 2.9 |
image = ">1.0.5 <1.1.9" |
使用大于 1.0.5 但小于 1.1.9 的版本 |
image = "<=2.7.10" |
小于 2.7.10 的任何版本 |
* |
任何版本 |
Cargo.lock
Cargo.toml 中的版本号很灵活,但我们不希望 Cargo 每次构建时都将我们升级到最新的库版本。因此,Cargo 有一个内置机制来防止这种情况。第一次构建项目时,Cargo 会输出一个 Cargo.lock 文件,该文件记录了它使用的每个 crate 的确切版本。以后的构建将参考这个文件并继续使用相同的版本。Cargo 仅在你告诉它时才升级到较新的版本,通过手动增加 Cargo.toml 文件中的版本号或运行 cargo update:
$ cargo update
Updating registry `https://github.com/rust-lang/crates.io-index`
Updating libc v0.2.7 -> v0.2.11
Updating png v0.4.2 -> v0.4.3
cargo update 仅升级到与在 Cargo.toml 中指定的内容兼容的最新版本。如果你指定了 image = "0.6.1",并且你想升级到 0.10.0 版本,你必须在 Cargo.toml 中改变它。下次构建时,Cargo 会更新到新版本的镜像库,并将新版本号存储在 Cargo.lock 中。前面的示例显示 Cargo 更新了 crates.io 上托管的两个 crate,存储在 Git 中的依赖项也会发生类似的情况。假设我们的 Cargo.toml 文件包含以下内容:
image = { git = "https://github.com/Piston/image.git", branch = "master" }
如果 cargo build 发现我们有一个 Cargo.lock 文件,它不会从 Git 存储库中提取新的更改。而是读取 Cargo.lock 并使用与上次相同的版本。但是 cargo update 将从 master 中提取,以便我们的下一个构建使用最新版本。
Cargo.lock 会自动生成,通常不会手动编辑它。如果项目是可执行文件,应该将 Cargo.lock 提交给版本控制。这样,每个人构建的项目都将始终获得相同的版本,Cargo.lock 文件的历史记录将记录你的依赖更新。
如果你的项目是一个普通的 Rust 库,不要提交 Cargo.lock。因为下游项目也拥有 Cargo.lock 文件,其中包含其整个依赖关系图的版本信息,他们会忽略依赖的库中的 Cargo.lock 文件。
在极少数情况下,项目如果是共享库(即输出是 .dll、.dylib 或 .so 文件),没有这样的下游项目,应该提交 Cargo.lock。
Cargo.toml 灵活的版本说明符使我们可以轻松地解决依赖之间的兼容性。 Cargo.lock 保证了构建一致性。
发布到 crates.io
详情请看 发布到 crates.io。
工作区间
详情请看 Cargo 工作空间。